Beschreibung
1、Excellent IP67 waterproof and dustproof function, can work in water. 316L stainless steel can be used for a long time even in acidic, alkaline and humid environments. It also has curved glass with anti-fog function.
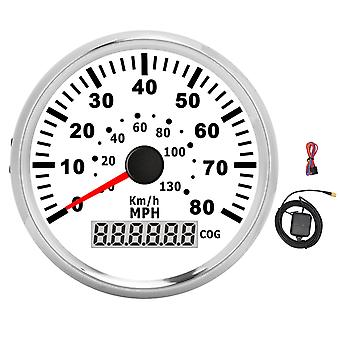
2、LCD clearly displays mileage, high indication accuracy, high reliability and stability, repeatability and versatility, and relatively simple drive and control. The stepper motor drives the pointer, which is suitable for the modification of various vehicles and can accurately display the engine speed.
3、The stepper motor with low power consumption, long life and high precision is suitable for the whole series of stepping instruments. It adopts ultra-wide working voltage design (long-term working voltage: 9 - 32V, maximum range: 36V (≤1 minute)).
4、The clasp of the harness connector can form the best and firm connection. The pressure gauge under strong vibration can also work normally. This product can be used for engine/generator sets, ships, construction machinery, agricultural machinery, automobile modification, etc.
5、The signal comes directly from the satellite signal receiver. The instrument has the advantages of high accuracy, fast position confirmation, and short start‑up time. Also called GPS speed sensor. Suitable for cars, ships, yachts, RV.
1 x GPS Speedometer 1 x GPS Speed Sensor 1 x Power Harness 1 x Operation Manual
Item Type: SpeedometerMaterial: Stainless steel 316L bezel + Anti-fog glassMounting Diameter: 85MM or 3 - 3/8"Indicating Range: 0 - 80MPH / 0 - 130KM/HWorking Voltage: 9 - 32VDCInput Signal: GPS antennaBacklight Color: Red or blueOperating Current: ≤60MAOperating Temperature: -30℃ - + 75℃Storage Temperature: -40℃ - + 85℃Protection Grade: IP67, back cover is IP5Installation Instructions:
1. Cut a hole Approx. 85mm/
3.3in in diameter in the panel (your engine room panel and instrument panel) and insert the instrument into the hole corresponding to the panel marked with a bump and make a small notch in this position to ensure that there is at least Approx. 85mm (3 - 3/8in) instrument panel on the back of the instrument.
2. After the instrument is installed into the panel, screw it down with the retaining ring.
3. Connect the wire and the instrument housing is directly connected to a 12/24V power supply.
4. Insert the wire harness and secure it firmly on the table.How to Use:
1. Red wire connect positive pole, blue wire connect negative pole, black signal wire connect sensor, orange backlight wire connect positive pole.
2. Install the instrument on the instrument panel and then connect the power supply.
-
Fruugo-ID:
355022341-771851087
-
EAN:
9056624346643
Produktsicherheitsinformationen
Bitte beachten Sie die unten aufgeführten spezifischen Produktsicherheitsinformationen für dieses Produkt
Die folgenden Informationen werden vom unabhängigen Drittanbieter bereitgestellt, der dieses Produkt verkauft.
Sicherheitswarnungen:
WARNING: Opening and/or repairing your device may result in risk of electric shock, damage to the device, fire and personal injury, and other hazards. We recommend that you seek professional assistance for device repairs and exercise caution when repairing your device yourself.
Lieferung und Rückgaben
Versand innerhalb von 3 Tagen
Versand von China.
Wir tun unser Bestes, um dafür zu sorgen, dass die von Ihnen bestellten Produkte vollständig und gemäß Ihrer Spezifikationen an Sie geliefert werden. Wenn Sie allerdings eine unvollständige Bestellung oder Artikel erhalten, die sich von den bestellten unterscheiden, oder es einen anderen Grund gibt, warum Sie mit Ihrer Bestellung nicht zufrieden sind, können Sie die gesamte Bestellung oder einzelne darin enthaltenen Produkte zurücksenden und eine vollständige Rückerstattung für die Artikel erhalten. Vollständige Rückgaberichtlinie ansehen